# mastermakrela - Projects & Memoirs - Complete Content
> Complete content of all articles and projects from mastermakrela.com
# Compiling Linux kernel on macOS
URL: https://mastermakrela.com/kernel/lkp/kernel-dev-on-macos/
Description: Step-by-step guide to compile Linux kernel on macOS using GCC from Homebrew. Learn challenges and solutions for kernel development on Apple systems.
## Compiling Linux kernel on macOS
### Introduction
Guided by the similarity of macOS and Linux,
one expects that:
(1.) cloning the kernel source
(`git clone git://git.kernel.org/pub/scm/linux/kernel/git/stable/linux.git --depth 1 -b v6.5.7`)
(2.) installing `gcc` from Homebrew
(`brew install gcc`)
(3.) running `make` (or rather `make defconfig && make -j $(nproc)`)
(4.) and waiting for a few minutes
should lead to a working kernel somewhere in `/arch/arm64/boot/` directory.
If you tried this yourself, you know it's not that simple.
Clone didn't go entirely smoothly because APFS isn't case-sensitive.
`make` used Apples `gcc` from Xcode, instead of the one from Homebrew.
It turned out the linker doesn't want to cooperate,
you need to install more tools (openssl, etc.) for the kernel to compile.
And in the end, it **still** did not work, because some files couldn't be found
in macOS.
There are two ways to solve this:
1. **Easy**: use a virtual machine
A lot easier (and saner) choice, which will also probably work
for more kernel versions.
But at the cost of performance and developer experience.
2. **Complicated**: solve all those problems on macOS
More challenging and most likely pinned to a specific kernel/tools version.
But I already did the hard part for you, so you can just enjoy the faster compile times and responsive VS Code.
### Build environment
#### The easy way
Our goal is the following setup:
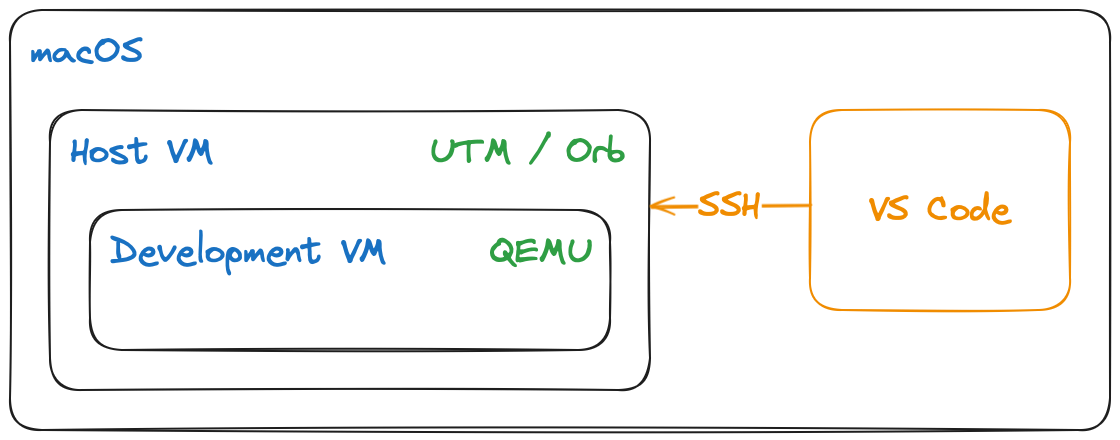 As you can imagine, only the [Development VM](#development-vm) setup is interesting.
Host VM is trivial, so I'll just link the VM managers I've used and move on.
##### Host VM
The classic way is to use [UTM](https://mac.getutm.app/).
An open-source, free, QEMU wrapper with a nice UI,
which works great with [arm64](https://mac.getutm.app/gallery/archlinux-arm),
even on [iOS](https://getutm.app/).
But recently I've discovered [OrbStack](https://orbstack.dev/) —
the _"fast, light, and easy way to run Docker containers and Linux"_ on macOS.
In my experience, it was ~2x faster than UTM (kernel compile time)
and the SSH setup was much easier.
(OrbStack automatically configures local SSH, shared folders, etc.
so connecting to the VM from VS Code and moving files around is a breeze.)
For both cases, the original documentation is so good that I won't repeat it here.
#### The hard way
So let's tackle it one problem at a time.
**1. Clone the kernel source**
```bash
git clone git://git.kernel.org/pub/scm/linux/kernel/git/stable/linux.git --depth 1 -b v6.5.7
```
You must get this exact version, otherwise, the patch might not work.
Also, with this Kernel version, we can ignore the case sensitivity "problem" because
it will still compile even with those conflicts.
The only side effect is that `make clean` won't work, because the scripts expect a case-sensitive filesystem.
**2. Install the necessary tools**
```bash
brew install clang-format llvm make openssl lld
```
I might have missed some, but the compiler will tell you what's missing. ;)
**3. Apply the patch**
If you've tried to compile the kernel, you have noticed that even when you install all tools,
some files (e.g., `elf.h`, `endian.h`) are missing - _because you're not on Linux_.
So we need to add them and [patch](https://github.com/mastermakrela/kernel-dev/blob/main/mac_patch_6-5-7.patch)
a few more things for it to work.
```bash
cd linux
curl -O https://raw.githubusercontent.com/mastermakrela/kernel-dev/main/mac_patch_6-5-7.patch
patch < mac_patch_6-5-7.patch
```
My patch was heavily inspired by [this one](https://github.com/ClangBuiltLinux/linux/commit/f06333e29addbc3d714adb340355f471c1dfe95a)
by [nickdesaulniers](https://github.com/ClangBuiltLinux/linux/commits?author=nickdesaulniers).
As you can imagine, only the [Development VM](#development-vm) setup is interesting.
Host VM is trivial, so I'll just link the VM managers I've used and move on.
##### Host VM
The classic way is to use [UTM](https://mac.getutm.app/).
An open-source, free, QEMU wrapper with a nice UI,
which works great with [arm64](https://mac.getutm.app/gallery/archlinux-arm),
even on [iOS](https://getutm.app/).
But recently I've discovered [OrbStack](https://orbstack.dev/) —
the _"fast, light, and easy way to run Docker containers and Linux"_ on macOS.
In my experience, it was ~2x faster than UTM (kernel compile time)
and the SSH setup was much easier.
(OrbStack automatically configures local SSH, shared folders, etc.
so connecting to the VM from VS Code and moving files around is a breeze.)
For both cases, the original documentation is so good that I won't repeat it here.
#### The hard way
So let's tackle it one problem at a time.
**1. Clone the kernel source**
```bash
git clone git://git.kernel.org/pub/scm/linux/kernel/git/stable/linux.git --depth 1 -b v6.5.7
```
You must get this exact version, otherwise, the patch might not work.
Also, with this Kernel version, we can ignore the case sensitivity "problem" because
it will still compile even with those conflicts.
The only side effect is that `make clean` won't work, because the scripts expect a case-sensitive filesystem.
**2. Install the necessary tools**
```bash
brew install clang-format llvm make openssl lld
```
I might have missed some, but the compiler will tell you what's missing. ;)
**3. Apply the patch**
If you've tried to compile the kernel, you have noticed that even when you install all tools,
some files (e.g., `elf.h`, `endian.h`) are missing - _because you're not on Linux_.
So we need to add them and [patch](https://github.com/mastermakrela/kernel-dev/blob/main/mac_patch_6-5-7.patch)
a few more things for it to work.
```bash
cd linux
curl -O https://raw.githubusercontent.com/mastermakrela/kernel-dev/main/mac_patch_6-5-7.patch
patch < mac_patch_6-5-7.patch
```
My patch was heavily inspired by [this one](https://github.com/ClangBuiltLinux/linux/commit/f06333e29addbc3d714adb340355f471c1dfe95a)
by [nickdesaulniers](https://github.com/ClangBuiltLinux/linux/commits?author=nickdesaulniers).
You can check if it worked with `git status`.
```bash
❯ git status
Not currently on any branch.
Changes to be committed:
(use "git restore --staged ..." to unstage)
modified: Makefile
modified: arch/arm64/kernel/vdso32/Makefile
new file: arch/arm64/kernel/vdso32/elf_helper.h
modified: arch/arm64/kvm/hyp/nvhe/Makefile
new file: arch/arm64/kvm/hyp/nvhe/endian_helper.h
new file: elf.h
new file: endian.h
modified: scripts/mod/file2alias.c
modified: scripts/subarch.include
Changes not staged for commit:
...
```
**4. Build the kernel**
First, we need to select the _right_ `clang`,
because the one from Xcode doesn't have a linker (`ld.lld`).
Then we'll create the default config and finally compile the kernel.
You might want to add a _local version_ to the kernel version,
so later you can tell that you're running your own kernel.
```bash
export PATH="$(brew --prefix make)/libexec/gnubin:$PATH"
export PATH="$(brew --prefix llvm)/bin:$PATH"
make LLVM=1 defconfig
make LLVM=1 menuconfig` # then `General setup` -> `Local version - append to kernel release
time make LLVM=1 ARCH=arm64 -j $(sysctl -n hw.logicalcpu) HOSTCFLAGS="-I./"
```
What does this command mean?
| | |
| ------------------------------- | --------------------------------------------------------------------------------------------------------------- |
| `time` | measure how long it takes; not needed, but nice to know |
| `LLVM=1` | use `clang` instead of `gcc`, see [here](https://www.kernel.org/doc/html/latest/kbuild/llvm.html) for more info |
| `ARCH=arm64` | compile for arm64 not sure if needed, but doesn't hurt ¯\\\_(ツ)\_/¯ |
| `-j $(sysctl -n hw.logicalcpu)` | use all available cores |
| `HOSTCFLAGS="-I./"` | add the current directory to the include path,
so the compiler can find the `.h` files we added |
If you still get an error, try running the last command again.
(I think it might have something to do with the case sensitivity,
but I'm not sure. I never had to run it more than twice, tho.)
**5. Congratulations!**
You should now have a fresh arm64 kernel in `./arch/arm64/boot/` directory.
#### Development VM
So we have a kernel now, and now we need to run it.
The easiest way is to use a QEMU VM.
But to do this we need a disk image with the rest of the system.
You can create, format and install Linux on it yourself,
but it's easier to just download it.
I recommend downloading the [Arch Linux](https://mac.getutm.app/gallery/archlinux-arm)
for [UTM](https://mac.getutm.app/).
As you can see it's a `.utm` archive, so we'll need to extract the `qcow2` file from it.
But before that, do yourself a favour and do the following:
1. open it in UTM
2. Remove `root` password
3. Enable autologin
4. Install some useful tools
`pacman -Syu lsof fastfetch strace`
Now to get the `qcow2` file:
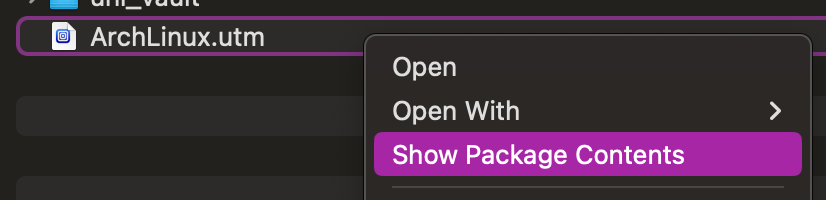
⌃-click the `.utm` archive and select "Show Package Contents".
Then from the _Data_ directory, copy the `.qcow2` file to the directory in which you want to run the VM.
##### Running the development VM
If you haven't already, install QEMU `brew install qemu` (or `pacman -Syu qemu` if you're playing on [easy](#the-easy-way)).
Then you can run the VM with the following command:
```bash
qemu-system-aarch64 \
-machine virt \
-cpu max \
-m 1024 \
-drive file=arch_aarch64.qcow2,format=qcow2 \
-serial stdio \
-kernel "/arch/arm64/boot/Image.gz" \
-append "root=/dev/vda2"
```
What does this command mean?
| | |
| --------------------- | ------------------------------------------------------------------------------------------------------ |
| `qemu-system-aarch64` | which QEMU vm to run |
| `-machine virt` | use [the generic arm64 machine](https://www.qemu.org/docs/master/system/openrisc/virt.html) |
| `-cpu max -m 1024` | configure the CPU and memory |
| `-drive file=...` | the disk image to use |
| `-serial stdio` | configure the VM to run in the current terminal |
| `-kernel ...` | the kernel to run |
| `-append ...` | the kernel command line arguments;
in this case the location of root filesystem inside our image |
If you haven't removed the password, you can log in with `root` and `root`.
To check which kernel you're running, you can use `fastfetch` (or `uname -a`):
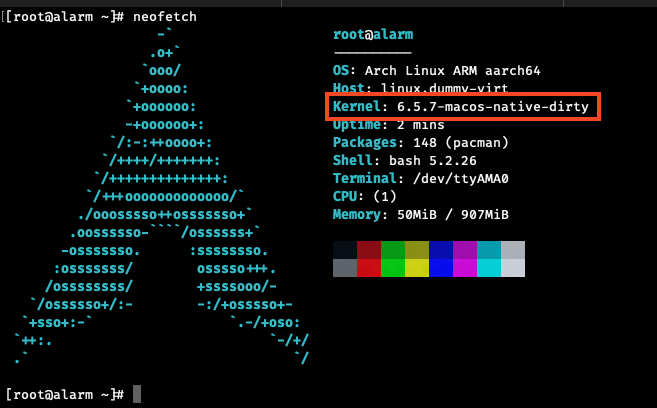
Highlighted you can see the local version we added earlier.
### Conclusion
So, we have a working kernel and a running VM.
We can start developing the modules now.
But a good editor setup is crucial for a good developer experience,
so if you're interested in that, check out the next article. (The link is under the footnotes)
---
---
# Debugging ARM kernel with `kgdb` in QEMU on macOS
URL: https://mastermakrela.com/kernel/lkp/debugging-with-kgdb/
Description: Complete guide to setup KGDB for debugging ARM64 Linux kernel in QEMU on macOS. Learn kernel debugging techniques for Apple Silicon development.
## Debugging ARM kernel with `kgdb` in QEMU
If you came here from Google and are only interested in the `kgdb` setup
for arm64 qemu, you can skip [here](#serial-connection-to-the-target-machine)
or read the more technical [article](/kernel/kgdb-aarch64-qemu-setup).
Otherwise, let's start from the beginning.
### What is `kgdb`?
According to [Wikipedia](https://en.wikipedia.org/wiki/KGDB):
> KGDB is a ==debugger== for the Linux kernel […].
> It requires two machines that are connected via a ==serial connection==. […]
> The target machine (the one being debugged) ==runs the patched kernel==
> and the other (host) machine runs ==gdb==.
> The GDB remote protocol is used between the two machines.
The highlights tell us exactly what we need to do.
### Setup
#### Preparing the kernel
First, we need a kernel with `kgdb` enabled.
For this go to your kernel source directory and run:
```bash
make menuconfig
```
Then navigate to `Kernel hacking` and enable `Compile the kernel with debug info`
and `KGDB: kernel debugging with remote gdb`. (Those settings might be in a different place depending on the kernel version.)
Then rebuild your kernel.
#### Installing `gdb` on the host
The good news is that there is `gdb` build for macOS,
the bad news is that it only works on Intel-based Macs.
[And it won't change until someone patches it for aarch64.](https://inbox.sourceware.org/gdb/1BD161F9-A6BB-4682-AD39-7698D56F0BB0@comcast.net/)
Luckily, we don't have to care about that, because [Rosetta 2]() exists.
This means we can just run the Intel version of `gdb` on our Apple Silicon Mac.
If you don't have it yet, install Rosetta:
```bash
/usr/sbin/softwareupdate --install-rosetta
```
Now we can start an _x86 terminal_ to run our _Intel_ programs.
In your terminal run:
```sh
arch -x86_64 zsh
```
To install the `gdb` we need a package manager (your arm brew won't work here):
```sh
/bin/bash -c "$(curl -fsSL https://raw.githubusercontent.com/Homebrew/install/HEAD/install.sh)"
```
Yes, it's the same command as for the arm version,
but because the environment is _x86_ it will install the _Intel_ version of Homebrew.
Automatically select the right brew version
Now you have two brew installations, to automatically select the right one
when you change the architecture in the terminal, add this to your `.zshrc`:
```sh
if [ "$(arch)" = "arm64" ]; then
eval "$(/opt/homebrew/bin/brew shellenv)"
else
eval "$(/usr/local/bin/brew shellenv)"
fi
```
Just to be sure check you have the right `brew` active:
```sh
❯ which brew
/usr/local/bin/brew
```
Now you can install [`gdb`](https://formulae.brew.sh/formula/gdb#default):
```sh
brew install gdb
```
#### Serial connection to the target machine
After [the first part](/kernel/lkp/kernel-dev-on-macos#running-the-development-vm),
our script to start the VM looked like this:
```sh
qemu-system-aarch64 \
-machine virt \
-cpu max \
-m 1024 \
-drive file=arch_aarch64.qcow2,format=qcow2 \
-serial stdio \
-kernel "/arch/arm64/boot/Image.gz" \
-append "root=/dev/vda2"
```
One could think, adding another serial connection to the VM should be this easy:
```diff
qemu-system-aarch64 \\
-machine virt \\
-cpu max \\
-m 1024 \\
-drive file=arch_aarch64.qcow2,format=qcow2 \\
-serial stdio \\
+ -serial tcp::1234,server,nowait \\
-kernel "/arch/arm64/boot/Image.gz" \\
-append "root=/dev/vda2"
```
The problem is that [the generic qemu arm64 machine](https://www.qemu.org/docs/master/system/openrisc/virt.html) has only one serial port: `ttyAMA0`.
Which is already used for the console.
Luckily, it also supports PCI devices like a serial card,
so we can add another serial port to the VM:
```diff
qemu-system-aarch64 \\
-machine virt \\
-cpu max \\
-m 1024 \\
-drive file=arch_aarch64.qcow2,format=qcow2 \\
- -serial stdio \\
- -serial tcp::1234,server,nowait \\
+ -chardev stdio,mux=on,id=char0 \\
+ -chardev socket,path=/tmp/qemu_socket.sock,server=on,wait=off,id=gnc0 \\
+ -mon chardev=char0,mode=readline \\
+ -serial chardev:char0 \\
+ -device pci-serial,id=serial0,chardev=gnc0 \\
-kernel "/arch/arm64/boot/Image.gz" \\
- -append "root=/dev/vda2"
+ -append "root=/dev/vda2 console=ttyAMA0 kgdboc=ttyS0 kgdbwait"
```
Of course, we need to tell the kernel to use the new serial port for `kgdb`.
And we've also added `kgdbwait` to tell the kernel to wait for the debugger
to connect when booting.
_You can find the full startup script [here](https://github.com/mastermakrela/kernel-dev/blob/main/qemu-run.sh) and more technical write-up [here](/kernel/kgdb-aarch64-qemu-setup)._
### Debugging
Now we are ready to test our debugging setup.
In one terminal window start the VM:
```sh
❯ arch
arm64
❯ ./qemu-run.sh
...
...
```
In another navigate to your kernel source directory, start `gdb`,
connect to the VM and continue the boot process:
```sh
❯ cd /linux
❯ arch -x86_64 zsh
❯ gdb ./vmlinux
(gdb) target remote /tmp/qemu_socket.sock
Remote debugging using /tmp/qemu_socket.sock
warning: multi-threaded target stopped without sending a thread-id, using first non-exited thread
[Switching to Thread 4294967294]
arch_kgdb_breakpoint () at ./arch/arm64/include/asm/kgdb.h:21
21 asm ("brk %0" : : "I" (KGDB_COMPILED_DBG_BRK_IMM));
(gdb) c
Continuing.
```
If you don't have `vmlinux` you have to [build the kernel](/kernel/lkp/kernel-dev-on-macos) first.
Now the VM should boot as usual and you can stop the execution at any time with
```sh
echo 0 > /proc/sys/kernel/hung_task_timeout_secs
```
After pausing the execution, you can do stuff in `gdb`,
e.g., see the system info:
```sh
(gdb) print init_uts_ns.name.release
$4 = "6.6.0-mastermakrela-g90b0c2b2edd1-dirty", '\\000'
```
or even change it:
```sh
(gdb) set var init_uts_ns.name.release="hello, world!"
(gdb) c
```
And see the change in the VM:
```sh
uname -a
Linux alarm hello, world! #3 SMP PREEMPT Sat Mar 2 00:19:49 CET 2024 aarch64 GNU/Linux
```
---
# ouichefs
URL: https://mastermakrela.com/kernel/lkp/ouichefs/
Description: A custom Linux filesystem implementation that automatically frees space when disk is full, featuring configurable eviction policies. Final project for Linux Kernel Programming course.
## `ouichefs`
_I'll write a longer article when I have more time, but for now, here's the GitHub link:_
[`ouichefs`](https://github.com/mastermakrela-rwth/ouichefs)
and overview of our changes:
[Documentation](https://github.com/mastermakrela-rwth/ouichefs/blob/v6.5.7/submission/documentation.typ)
---
# Linux Kernel Programming
URL: https://mastermakrela.com/kernel/lkp/
Description: Complete guide to Linux kernel development on Apple Silicon Macs. Learn to compile, debug, and develop kernel modules using QEMU, VS Code, and KGDB on macOS.
In the winter semester 2023/24 I took part in the
[Linux Kernel Programming](https://www.os.rwth-aachen.de/cms/os/Studium/Lehrportfolio/~bdduoy/Linux-Kernel-Programming/lidx/1/)
course at RWTH.
But because I'm mainly a Mac user (and like a challenge),
I decided to do the whole course on my M1 MacBook Pro (2020).
_I mean, they are both Unix-like systems, right? What could possibly go wrong?_
Well… a few things, actually.
Some are connected with macOS itself, others with the ARM architecture.
But I was determined to prove that it was possible.
I've split the setup into a few articles,
each focusing on a different aspect of the setup.
1. [Compiling Linux kernel on macOS](/kernel/lkp/kernel-dev-on-macos) — decide if native is for you and the alternatives
2. [VS Code setup](/kernel/lkp/vs-code-setup) — autocompletion, formatting, linting etc.
3. [Debugging with QEMU](/kernel/lkp/debugging-with-kgdb) — `kgdb` and `qemu` setup
4. [`ouichefs`](/kernel/lkp/ouichefs) — final project for this course
---
_If you're looking for the finished setup, it's [here](https://github.com/mastermakrela/kernel-dev). But to understand how it works, you'll still probably have to read the articles. ;)_
What does finished mean?
- Compile arm64 Linux kernel on macOS
- VS Code with auto-completion, formatting, linting etc.
- script to start `qemu` with the compiled kernel, configured for debugging with `kgdb`
---
# VS Code for kernel development
URL: https://mastermakrela.com/kernel/lkp/vs-code-setup/
Description: Configure VS Code for optimal Linux kernel development experience. Setup extensions, autocompletion, formatting, and linting for kernel code on macOS.
## VS Code for kernel development
Now that we know that the [kernel compiles and runs](/kernel/lkp/kernel-dev-on-macos),
we can start making some changes to it or write some modules.
To make this experience more ~~bearable~~ enjoyable,
we'll use VS Code with some extensions.
Most of them are automatically recommended to install,
but because the kernel isn't your usual everyday codebase,
we have to configure them for optimal performance.
As before I'll assume your directory looks something like this:
```sh
.
├── linux # The kernel source code
└── my-kernel-module
```
Then the interesting files for us will be:
```sh
.
├── linux # The kernel source code
│ ├── .clang-format
│ ├── .vscode
│ │ ├── c_cpp_properties.json
│ │ ├── settings.json
│ ├── scripts
│ │ └── checkpatch.pl
└── my-kernel-module
│ ├── .vscode
│ │ ├── c_cpp_properties.json
│ │ ├── settings.json
```
I'll mention all of them in the context of the extension that uses it.
### Extensions
#### C/C++
> [C/C++ IntelliSense, debugging, and code browsing](https://marketplace.visualstudio.com/items?itemName=ms-vscode.cpptools)
It does exactly what it says on the tin
and if you've ever opened a C file in VS Code,
you probably already have it.
As you might have guessed, it's configured in `.vscode/c_cpp_properties.json`.
There you can have multiple configurations, I've named [mine](https://github.com/mastermakrela/kernel-dev/blob/main/.vscode/c_cpp_properties.json)
`Linux Modules`.
If you're not using the same directory structure as me or aren't using arm64 mac,
you might need to change:
- **include paths** - so that the extension can find the kernel headers
(also applies to `.config`)
(otherwise you won't get any type information or code completion)
- **compiler path/mode** - so that the extension can compile your code using the same compiler as you
(if not you might get warnings during build that aren't present in the editor)
#### Clang-Format
> [Clang-Format](https://marketplace.visualstudio.com/items?itemName=xaver.clang-format)
When writing kernel code, you should follow the kernel's coding style.
You could run clang-format manually from the terminal, but it's much nicer if it happens automatically (on save).
To configure the formatting, you need `.clang-format` in the root of your project.
Just symlink the one from the kernel source code:
```sh
ln -s ../linux/.clang-format .clang-format
```
#### Makefile Tools
> [Makefile Tools](https://marketplace.visualstudio.com/items?itemName=ms-vscode.makefile-tools)
Another one that VS Code will recommend.
#### checkpatch
> [checkpatch](https://marketplace.visualstudio.com/items?itemName=idanp.checkpatch)
This one is a bit more niche.
Another part of the kernel's coding style is to run `checkpatch.pl` on your code.
It's a script that checks your code for common mistakes and style issues,
and sometimes even suggests fixes.
Normally you would have to run it in the terminal,
but this extension runs it automatically on save and shows the results in the editor.
To get all automatic fixes, you can run a [script](https://github.com/mastermakrela/kernel-dev/blob/main/checkpatch.sh) like this:
```sh
CHECKPATCH_PATH="../linux/scripts/checkpatch.pl"
find . -type f -name "*.c" -o -name "*.h" | xargs perl $CHECKPATCH_PATH -f --no-tree --fix-inplace
```
#### GitHub Copilot
> [GitHub Copilot](https://marketplace.visualstudio.com/items?itemName=GitHub.copilot)
This one might be controversial, but asking the editor about what some function is,
was often quicker than finding it in the documentation.
Also, if you, like me, are coming from a more _modern_ language,
the Copilot is great for writing the boilerplate code.
### Settings
There are also some things in VS Code itself, that will make your life easier.
```json
{
{
"files.exclude": {
"**/.*.*.cmd": true,
"**/.*.d": true,
"**/.*.S": true,
"**/.*.tmp": true,
"**/*.a": true,
"**/*.dtb": true,
"**/*.ko": true,
"**/*.mod": true,
"**/*.mod.c": true,
"**/*.o": true,
"**/modules.order": true,
"**/*.symvers": true
},
"[c]": {
"editor.detectIndentation": false,
"editor.tabSize": 8,
"editor.insertSpaces": false,
"editor.rulers": [
80,
100
]
},
"files.associations": {
"*.h": "c"
},
"C_Cpp.errorSquiggles": "enabled",
"C_Cpp_Runner.msvcBatchPath": "",
}
}
```
- **files.exclude** - building a kernel module involves a lot of auxilary files,
which will clutter your file explorer, so let's hide them
- **[c]** - some settings for C files
- mostly just conform to kernel coding style
- also **rulers** to show you how much space you have left in each line
- **files.associations** - so that `.h` files are treated as C files
(helps with IntelliSense and highlighting)
---
### Honourable (not kernel-specific) mentions
If you're using VS Code for other stuff, you might also want to check out:
- [GitLens](https://marketplace.visualstudio.com/items?itemName=eamodio.gitlens)
for the contextual git information and better diffs
- [cSpell](https://marketplace.visualstudio.com/items?itemName=streetsidesoftware.code-spell-checker)
for spell-checking in **code!**
- [LTeX](https://marketplace.visualstudio.com/items?itemName=valentjn.vscode-ltex)
for spell-checking in comments and strings
- [Tailscale](https://marketplace.visualstudio.com/items?itemName=tailscale.tailscale)
for connecting with other devices
---
# Debugging ARM kernel with `kgdb` in QEMU
URL: https://mastermakrela.com/kernel/kgdb-aarch64-qemu-setup/
Description: Technical guide to setting up KGDB for debugging ARM64 Linux kernel in QEMU. Complete configuration for serial ports and debugging workflow.
## Debugging ARM kernel with `kgdb` in QEMU
During the development of the kernel or its modules,
it's often necessary to debug it/them while running.
The kernel provides a built-in debugger for it called [`kgdb`](https://www.kernel.org/doc/html/latest/dev-tools/kgdb.html).
The problem is that [the generic qemu arm64 machine](https://www.qemu.org/docs/master/system/openrisc/virt.html) has only one serial port: `ttyAMA0`,
which is usually already used for the console.
The solution is to add another serial port to the VM.
Below I explain how to easily do it.
### Starting point
Your startup script probably looks similar to mine:
```sh
HDA="-drive file=arch_aarch64.qcow2,format=qcow2"
SHARED="./share"
VIRTFS+=" --virtfs local,path=${SHARED},mount_tag=share,security_model=passthrough,id=share "
KERNEL=./linux/arch/arm64/boot/Image
CMDLINE='root=/dev/vda2 rw console=ttyAMA0'
qemu-system-aarch64 \
-nodefaults \
-nographic \
-vga none \
-cpu max \
-machine virt \
-m 1024 \
${HDA} \
${VIRTFS} \
-serial stdio \
-kernel "${KERNEL}" \
-append "${CMDLINE} "
```
It does the basic setup (disks, shared folder, use my kernel, etc.)
and starts the VM in terminal mode — useful when working in a VM over ssh.
### Kernel debugging
I'll assume you know how to configure the kernel for debugging.
If not, you might want to read my article about [Debugging ARM kernel with `kgdb` in QEMU](/kernel/lkp/debugging-with-kgdb)
on macOS.
We can't reuse the serial connection we're already using for the console,
so we need to add another one through qemu.
```diff
HDA="-drive file=arch_aarch64.qcow2,format=qcow2"
SHARED="./share"
VIRTFS+=" --virtfs local,path=${SHARED},mount_tag=share,security_model=passthrough,id=share "
KERNEL=./linux/arch/arm64/boot/Image
- CMDLINE='root=/dev/vda2 rw console=ttyAMA0'
+ CMDLINE='root=/dev/vda2 rw console=ttyAMA0 kgdboc=ttyS0 kgdbwait'
qemu-system-aarch64 \
-nodefaults \
-nographic \
-vga none \
-cpu max \
-machine virt \
-m 1024 \
${HDA} \
${VIRTFS} \
-serial stdio \
+ -serial tcp::1234,server,nowait \
-kernel "${KERNEL}" \
-append "${CMDLINE} "
```
Now we should be able to connect to the VM with `gdb`:
```bash
cd ./linux
gdb ./vmlinux
(gdb) target remote :1234
:1234: Connection timed out.
```
### The Problem
With the above setup, the `gdb` will always time out,
as if there was no server listening on the other end.
In fact, that's exactly what happens.
The kernel starts the `kgdb` server and connects it to `ttyS0`.
There is only one small problem: `ttyS0` doesn't exist.
According to QEMU's documentation, the ARM virt machine has only one serial port: `ttyAMA0`.
So now that we know the problem, how do we fix it?
Luckily virt machine supports a PCI serial card that can be added to the VM:
```diff
qemu-system-aarch64 \\
-nodefaults \\
-nographic \\
-vga none \\
-cpu max \\
-machine virt \\
-m 1024 \\
${HDA} \\
${VIRTFS} \\
- -serial stdio \\
- -serial tcp::1234,server,nowait \\
+ -chardev stdio,mux=on,id=char0 \\
+ -chardev socket,path=/tmp/qemu_socket.sock,server=on,wait=off,id=gnc0 \\
+ -mon chardev=char0,mode=readline \\
+ -serial chardev:char0 \\
+ -device pci-serial,id=serial0,chardev=gnc0 \\
-kernel "${KERNEL}" \\
-append "${CMDLINE} "
```
Because `chardev` doesn't support tcp, we switched to a unix socket.
The good news is that gdb doesn't care if the remote is a tcp or unix socket,
so it just works:
```bash
gdb ./vmlinux
(gdb) target remote /tmp/qemu_socket.sock
Remote debugging using /tmp/qemu_socket.sock
warning: multi-threaded target stopped without sending a thread-id, using first non-exited thread
[Switching to Thread 4294967294]
arch_kgdb_breakpoint () at ./arch/arm64/include/asm/kgdb.h:21
21 asm ("brk %0" : : "I" (KGDB_COMPILED_DBG_BRK_IMM));
(gdb) c
Continuing.
```
---
You can find the full script [here](https://github.com/mastermakrela/kernel-dev/blob/main/qemu-run.sh)
with the whole development setup I'm using.
The solution seems obvious once it's found,
but to come to this elegant solution I had to look for hours through different mailing lists,
forums, and documentation.
So if you found this page by googling "kgdb aarch64 qemu" or something similar,
you're welcome. :D
---
If you are here, you might be interested in my other [articles](/kernel/lkp)
about Linux kernel development on macOS.
---
Big thank you to the sources that helped me find the solution:
- https://bugs.debian.org/cgi-bin/bugreport.cgi?bug=973484#14
- https://unix.stackexchange.com/questions/479085/can-qemu-m-virt-on-arm-aarch64-have-multiple-serial-ttys-like-such-as-pl011-t
---
# mastermakrela - Projects & Memoirs
URL: https://mastermakrela.com/
Description: Stuff I did or am currently working on.
## Projects
##### [**Flutter Handoff**](/flutter-handoff)
June 2025
Do you know how sometimes an icon appears in your
macOS dock {#snippet tooltip()} {/snippet} when you have an app open on your iPhone?
And when you click it a webpage opens in `$BROWSER` with the app's content?
That's Apple's feature called [Handoff](https://support.apple.com/en-us/102426).
Wouldn't it be nice if your flutter app could do the same?
Now it can! [Read more](/flutter-handoff) for implementation details.
Or try it out yourself: pub.dev/packages/handoff.
##### [**Bun C Plugin**](/bun-plugin-c)
January 2025 - Present
What if you could just:
```ts
import lib, { add } from './lib.c';
const sum = add(1, 2.5); // sum is 3
lib.hello(); // does whatever the C function does
```
in your TypeScript code?
Well in [Bun](https://bun.sh) it's not just possible, it's trivial.
[Read more](/bun-plugin-c) if you're interested.
##### [**Linux Kernel Programming**](/kernel/lkp)
Winter 2023/24
My journey with **compiling**, **developing** and **debugging** the Linux Kernel
under macOS running on an [Apple Silicon](https://en.wikipedia.org/wiki/Apple_silicon).
_Believe me, it was harder than it sounds._
- Final result: [`ouichefs`](/kernel/lkp/ouichefs)
A simple filesystem that can free the space automatically when the disk is too full,
with a configurable eviction policy.
##### [`WHILE` interpreter](https://while.mastermakrela.com)
Summer Semester 2023
A simple interpreter for the WHILE language with derivation tree visualization and other goodies.
Based on [Semantics and Verification of Software](https://moves.rwth-aachen.de/teaching/ss-23/savos/) Course from RWTH.
##### [Climate and Animal-Responsible Diet](https://card.mastermakrela.com/)
Summer Semester 2023
University project to create an App that helps to eat in a way that is better for the environment.
It helps you track what you eat, proposes better recipes
and shows you how much CO2 and water you saved by eating differently.
---
## Mini-projects
##### [Figma Plugin Svelte](https://github.com/mastermakrela/figma-plugin-svelte?tab=readme-ov-file#figma--vite--svelte)
During work on my master thesis, I had to create a Figma plugin.
And as always I wanted to use svelte, to make my life easier.
Because I didn't find any (modern — yes with **Svelte 5**) template for svelte, I created one.
It is Svelte 5 ready and adds typed messages between UI and logic, to spare me some headaches. ;)
##### [Cloudflare Pages Clean-up Worker](https://github.com/mastermakrela/cf-cleanup-worker)
Many of my projects (and other projects I manage) are hosted on [Cloudflare Pages](https://developers.cloudflare.com/pages).
One of my favourite features are automatic deployments from GitHub,
but once deployed they stay there _forever_.
That means every old deployment can (theoretically, if you know the URL) also be accessed forever.
So I've created a simple scheduled worker that cleans up old deployments.
(Also it makes the dashboard a lot more readable, if you have rules to skip some branches, like those from `dependabot`.)
##### [Elysia Supabase Plugin](https://github.com/mastermakrela/elysia-supabase)
A simple plugin for [Elysia](https://elysiajs.com)
that makes writing Supabase Edge Functions easier.
Of course, works not only on supabase, but everywhere you can run Elysia.
On JSR:
---
## GitHub activity
{/snippet} when you have an app open on your iPhone?
And when you click it a webpage opens in `$BROWSER` with the app's content?
That's Apple's feature called [Handoff](https://support.apple.com/en-us/102426).
Wouldn't it be nice if your flutter app could do the same?
Now it can! [Read more](/flutter-handoff) for implementation details.
Or try it out yourself: pub.dev/packages/handoff.
##### [**Bun C Plugin**](/bun-plugin-c)
January 2025 - Present
What if you could just:
```ts
import lib, { add } from './lib.c';
const sum = add(1, 2.5); // sum is 3
lib.hello(); // does whatever the C function does
```
in your TypeScript code?
Well in [Bun](https://bun.sh) it's not just possible, it's trivial.
[Read more](/bun-plugin-c) if you're interested.
##### [**Linux Kernel Programming**](/kernel/lkp)
Winter 2023/24
My journey with **compiling**, **developing** and **debugging** the Linux Kernel
under macOS running on an [Apple Silicon](https://en.wikipedia.org/wiki/Apple_silicon).
_Believe me, it was harder than it sounds._
- Final result: [`ouichefs`](/kernel/lkp/ouichefs)
A simple filesystem that can free the space automatically when the disk is too full,
with a configurable eviction policy.
##### [`WHILE` interpreter](https://while.mastermakrela.com)
Summer Semester 2023
A simple interpreter for the WHILE language with derivation tree visualization and other goodies.
Based on [Semantics and Verification of Software](https://moves.rwth-aachen.de/teaching/ss-23/savos/) Course from RWTH.
##### [Climate and Animal-Responsible Diet](https://card.mastermakrela.com/)
Summer Semester 2023
University project to create an App that helps to eat in a way that is better for the environment.
It helps you track what you eat, proposes better recipes
and shows you how much CO2 and water you saved by eating differently.
---
## Mini-projects
##### [Figma Plugin Svelte](https://github.com/mastermakrela/figma-plugin-svelte?tab=readme-ov-file#figma--vite--svelte)
During work on my master thesis, I had to create a Figma plugin.
And as always I wanted to use svelte, to make my life easier.
Because I didn't find any (modern — yes with **Svelte 5**) template for svelte, I created one.
It is Svelte 5 ready and adds typed messages between UI and logic, to spare me some headaches. ;)
##### [Cloudflare Pages Clean-up Worker](https://github.com/mastermakrela/cf-cleanup-worker)
Many of my projects (and other projects I manage) are hosted on [Cloudflare Pages](https://developers.cloudflare.com/pages).
One of my favourite features are automatic deployments from GitHub,
but once deployed they stay there _forever_.
That means every old deployment can (theoretically, if you know the URL) also be accessed forever.
So I've created a simple scheduled worker that cleans up old deployments.
(Also it makes the dashboard a lot more readable, if you have rules to skip some branches, like those from `dependabot`.)
##### [Elysia Supabase Plugin](https://github.com/mastermakrela/elysia-supabase)
A simple plugin for [Elysia](https://elysiajs.com)
that makes writing Supabase Edge Functions easier.
Of course, works not only on supabase, but everywhere you can run Elysia.
On JSR:
---
## GitHub activity
---
## Apps I've worked on
---
_Someday there will be more of a page here…_
For now, you can check out my [github](https://github.com/mastermakrela).
---
# Bun C Plugin
URL: https://mastermakrela.com/bun-plugin-c/
Description: A Bun plugin that allows you to import C functions directly in TypeScript code. See how to use C libraries seamlessly in your Bun projects.
# Bun C Plugin
| | |
| ------ | --------------------------------------------- |
| GitHub | https://github.com/mastermakrela/bun-plugin-c |
| JSR | https://jsr.io/@mastermakrela/bun-plugin-c |
What if you could just:
```ts
import lib, { add } from './lib.c';
const sum = add(1, 2.5); // sum is 3
lib.hello(); // does whatever the C function does
```
in your TypeScript code?
### How and why?
The goal of a bundler is to _bundle_ code
structured in a way that makes sense during development
to something that makes sense in production.
There is lots of compiling, optimising, etc. involved,
but this isn't relevant now.
The part that interests us is the **translation of one language to another**.
Usually it's something like:
- TypeScript to JavaScript
- Svelte to JavaScript
- React (`.tsx`) to JavaScript
- etc.
You see the pattern, right?
But we are used to importing other things, like `.css`, `.svg`, `.png` etc.
How does this work if at the end the bundle wants JS?
Well, Bun lets you write [plugins](https://bun.sh/docs/runtime/plugins).
In short, they let you register function
that is called with a file with an extension is being imported,
and it has to somehow give something back that the bundler can understand (usually a string or an object).
`index.ts`:
```ts
import lib from './lib.c';
// more code here...
```
`plugin.ts`:
```ts
import { plugin, type BunPlugin } from 'bun';
plugin({
name: 'Custom loader',
setup(build) {
build.onLoad({ filter: /\.c$/ }, async ({ path }) => {
// called with `/path/to/lib.c`
});
}
});
```
Okay, so how do we give something useful back?
Well, as we're dealing with C,
we should probably first compile it and then use FFI to call the functions.
Luckily in Bun there is an even simpler way,
thanks to it's built in [C compiler](https://bun.sh/docs/api/cc),
we just have to give it a path to a file,
and we get our symbols back as a JS object.
```ts
// more code before...
build.onLoad({ filter: /\.c$/ }, async (args) => {
const { symbols: exports } = cc({
source: args.path,
symbols
});
return exports;
});
/// more code here...
```
Great! That was easy. So are we done?
Not quite, you've probably noticed the `symbols` argument passed to `cc`,
which is undefined in this code snippet.
This object tells the compiler which symbols to export and what their types are (think `.h` files in C).
Then let us just get those `symbols`!
That’s where the fun begins.
For the proof of concept, I’ve used a rudimentary parser written in JS,
to see if this approach is even viable.
It currently supports only some function definitions (e.g., it doesn't like function pointers).
But it works, and you can try it out yourself [here](https://github.com/mastermakrela/bun-plugin-c/tree/main?tab=readme-ov-file#simple-example).
Additionally, because we had to extract the type information for all the functions anyway,
it gives you a TypeScript interface that you can then use in your code.
### Improvements over `cc`
But why not just use Bun's `cc` directly in your code?
1. Ergonomics:
What is nicer to write? One import or a whole file wrapping the compile step?
2. Convenience:
If the underlying C file changes, you don't have to change anything in your TS code.
Just call the newly defined function as the symbols are detected automatically.
3. Type safety:
Bun's `cc` gives you `Record`, which means you don't get any autocompletion, type checking or anything.
This plugin at least gives you an interface that you can use in your code.
### Conclusion
This was a fun little experiment,
and it showed me that there might be something more interesting here to explore.
If I find time,
I'd love to replace the JS based parser with a real deal
written in a native language ([Native plugins](https://bun.sh/docs/bundler/plugins#native-plugins)).
It would also be interesting to find a way to make the generated types _just work™_,
without any copying and additional work.
_If I come to improving this plugin, I'll write another article about it here, so if you're interested in that, bookmark this page and check it in 1-3 months._
(Or follow me on [GitHub](https://github.com/mastermakrela) I should probably get some real social media going.)
---
---
# Flutter Handoff
URL: https://mastermakrela.com/flutter-handoff/
Description: Learn how to implement Apple Handoff in Flutter apps. Share activity between iOS, macOS, and web with this practical guide and pub.dev package.
# Flutter Handoff
First _what is Handoff_? According to the Apple Docs:
> Use Handoff to transfer activities the user starts on one iOS, watchOS, or macOS device to a different device.
> ~ Apple Developer Documentation
This is the source of the Apple magic that makes all the devices feel like a single entity.
With this, we could implement the full Handoff with sharing activity between Flutter apps
running on iOS and macOS and maybe even web.
But for now I was only interested in sharing a link from my app that can be opened in a browser on a Mac.
This was easier than I expected.
One just has to:
1. Create [`NSUserActivity`](https://developer.apple.com/documentation/foundation/nsuseractivity) with `webpageURL` set to the URL you want to open.
Code
```swift
let activity = NSUserActivity(activityType: activityType)
activity.title = title
activity.webpageURL = url
activity.isEligibleForHandoff = true
activity.isEligibleForSearch = false
activity.isEligibleForPublicIndexing = false
```
2. Call `activity.becomeCurrent()`.
Code
```swift
activity.becomeCurrent()
```
3. Enjoy the magic!
To my surprise, there was no Flutter plugin that implemented this functionality.
So I thought _fine, I'll do it myself._
However, setting up the whole
Flutter plugin boilerplate + CocoaPods boilerplate,
I thought it would be a perfect opportunity to test how well Claude Code can perform on such a task.
So I created a prompt summarizing the `NSUserActivity` API and the Flutter plugin getting started page
together with what I wanted to achieve.
With this input Claude proceeded to **one-shot** the task — _as it's called in the lingo_.
All I had to do was clean up the interface, test the plugin, add a readme, and publish it to pub.dev.
## How to use it?
In your Flutter project run:
```zsh
flutter pub add handoff
```
Then somewhere in your app, call:
```dart
await Handoff.setHandoffUrl(
"http://mastermakrela.com//flutter-handoff",
title: "Flutter Handoff",
);
```
Now if you run this on a real iOS device where you are logged in to your iCloud account,
you should see the link appear on all other nearby devices logged in to the same iCloud account.
In some cases it also makes sense to remove the activity, e.g., when the user navigates away from the page.
In that case you can call:
```dart
Handoff.clearHandoff();
```
And the link will be gone from the Dock or the App Switcher.
## Notes on real world usage
### What and when to link?
If your Flutter app uses [`go_router`](https://pub.dev/packages/go_router),
it makes sense to create a [`NavigationObserver`](https://api.flutter.dev/flutter/widgets/NavigatorObserver-class.html) subclass
that will set and clear the handoff URL based on which page of your app is currently active
(obviously it only makes sense to link the pages that have counterpart in your web app):
```dart
class GoRouterObserver extends NavigatorObserver {
@override
void didPush(Route route, Route? previousRoute) {
print('didPush: $route');
if(route.hasHandoffUrl) {
Handoff.setHandoffUrl(
route.handoffUrl,
title: route.handoffTitle,
);
} else {
Handoff.clearHandoff();
}
}
}
final GoRouter router = GoRouter(
observers: [GoRouterObserver()],
routes: [ /* your routes */ ]
);,
```
or something like that.
### Links versioning
From my experience, the web pages change more rapidly than the app,
additionally, you can't force app users to update the app,
so if you hardcode the links in the app, sooner or later they will break.
In my opinion the best way is to lean into the flexibility of the web and let your web server handle different versions of the links.
In my case I've set up a subpath `https://example.com/handoff/` that allows the web server to decide what to do with the request.
If you're feeling fancy, you could even add `?version=` query parameter to the URL.
But what's even better, with this approach you can use [associated domains](https://developer.apple.com/documentation/xcode/supporting-associated-domains)
to open your app directly on another device with your app installed,
**without forcing all links from your domain to open in the app**.
This is especially useful if you have one phone with the development version of the app and one with the current production version,
then you can quickly land on the same page on both devices,
without having to manually go through all the screens.
Example association JSON file
```json
{
"applinks": {
"appIDs": ["ABCDE12345.com.example.app"],
"details": [
{
"appID": "TEAMID.com.example.app",
"paths": ["/handoff/*"]
}
]
}
}
```
## Links to code
| | |
| ------- | ------------------------------------------------ |
| GitHub | https://github.com/mastermakrela/flutter-handoff |
| pub.dev | https://pub.dev/packages/handoff |
---
---