Linux Kernel Programming
Compiling Linux kernel on macOS
Introduction
Guided by the similarity of macOS and Linux, one expects that:
(1.) cloning the kernel source
(git clone git://git.kernel.org/pub/scm/linux/kernel/git/stable/linux.git --depth 1 -b v6.5.7)
(2.) installing gcc from Homebrew
(brew install gcc)
(3.) running make (or rather make defconfig && make -j $(nproc))
(4.) and waiting for a few minutes
should lead to a working kernel somewhere in /arch/arm64/boot/ directory.
If you tried this yourself, you know it’s not that simple.
Clone didn’t go entirely smoothly because APFS isn’t case-sensitive. make used Apples gcc from Xcode, instead of the one from Homebrew.
It turned out the linker doesn’t want to cooperate,
you need to install more tools (openssl, etc.) for the kernel to compile.
And in the end, it still did not work, because some files couldn’t be found
in macOS.
There are two ways to solve this:
Easy: use a virtual machine
A lot easier (and saner) choice, which will also probably work for more kernel versions foreshadowing?. But at the cost of performance and developer experience. 1
Complicated: solve all those problems on macOS
More challenging and most likely pinned to a specific kernel/tools version. But I already did the hard part for you, so you can just enjoy the faster compile times and responsive VS Code.
Build environment
The easy way
Our goal is the following setup:
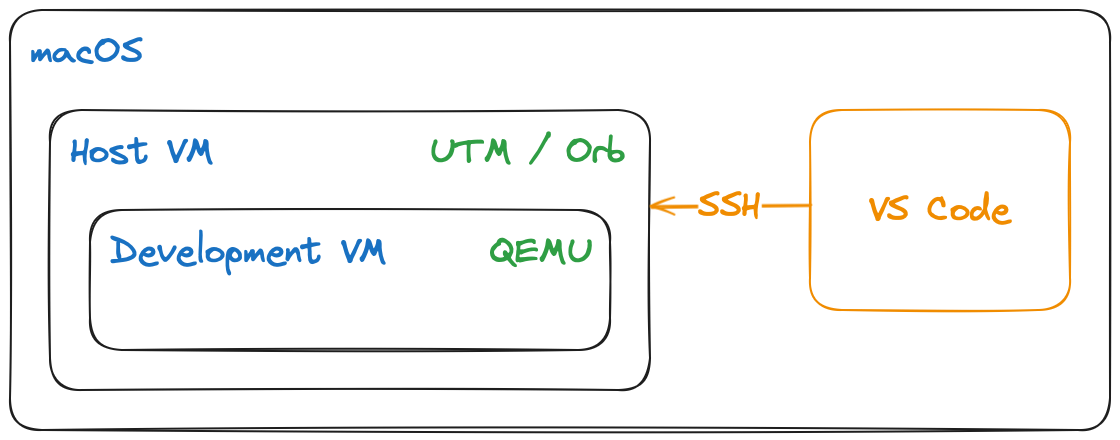
As you can imagine, only the Development VM setup is interesting.
Host VM is trivial, so I’ll just link the VM managers I’ve used and move on.
Host VM
The classic way is to use UTM. An open-source, free, QEMU wrapper with a nice UI, which works great with arm64, even on iOS.
But recently I’ve discovered OrbStack — the “fast, light, and easy way to run Docker containers and Linux” on macOS.
In my experience, it was ~2x faster than UTM (kernel compile time) and the SSH setup was much easier. (OrbStack automatically configures local SSH, shared folders, etc. so connecting to the VM from VS Code and moving files around is a breeze.)
For both cases, the original documentation is so good that I won’t repeat it here.
The hard way
So let’s tackle it one problem at a time.
1. Clone the kernel source
git clone git://git.kernel.org/pub/scm/linux/kernel/git/stable/linux.git --depth 1 -b v6.5.7You must get this exact version, otherwise, the patch might not work.
Also, with this Kernel version, we can ignore the case sensitivity “problem” because
it will still compile even with those conflicts. 2 The only side effect is that make clean won’t work, because the scripts expect a case-sensitive filesystem.
2. Install the necessary tools
brew install clang-format llvm make openssl lldI might have missed some, but the compiler will tell you what’s missing. ;)
3. Apply the patch
If you’ve tried to compile the kernel, you have noticed that even when you install all tools,
some files (e.g., elf.h, endian.h) are missing - because you’re not on Linux.
So we need to add them and patch a few more things for it to work.
cd linux
curl -O https://raw.githubusercontent.com/mastermakrela/kernel-dev/main/mac_patch_6-5-7.patch
patch < mac_patch_6-5-7.patch
My patch was heavily inspired by this one by nickdesaulniers.
You can check if it worked with `git status`.
❯ git status
Not currently on any branch.
Changes to be committed:
  (use "git restore --staged <file>..." to unstage)
	modified:   Makefile
	modified:   arch/arm64/kernel/vdso32/Makefile
	new file:   arch/arm64/kernel/vdso32/elf_helper.h
	modified:   arch/arm64/kvm/hyp/nvhe/Makefile
	new file:   arch/arm64/kvm/hyp/nvhe/endian_helper.h
	new file:   elf.h
	new file:   endian.h
	modified:   scripts/mod/file2alias.c
	modified:   scripts/subarch.include

Changes not staged for commit:
...
4. Build the kernel
First, we need to select the right clang,
because the one from Xcode doesn’t have a linker (ld.lld).
Then we’ll create the default config and finally compile the kernel.
You might want to add a local version to the kernel version, so later you can tell that you’re running your own kernel.
export PATH="$(brew --prefix make)/libexec/gnubin:$PATH"
export PATH="$(brew --prefix llvm)/bin:$PATH"
make LLVM=1 defconfig
make LLVM=1 menuconfig` # then `General setup` -> `Local version - append to kernel release
time make LLVM=1 ARCH=arm64 -j $(sysctl -n hw.logicalcpu) HOSTCFLAGS="-I./"
What does this command mean?
time | measure how long it takes; not needed, but nice to know |
LLVM=1 | use clang instead of gcc, see here for more info |
ARCH=arm64 | compile for arm64 not sure if needed, but doesn’t hurt ¯\_(ツ)_/¯ |
-j $(sysctl -n hw.logicalcpu) | use all available cores |
HOSTCFLAGS="-I./" | add the current directory to the include path, so the compiler can find the .h files we added |
If you still get an error, try running the last command again. (I think it might have something to do with the case sensitivity, but I’m not sure. I never had to run it more than twice, tho.)
5. Congratulations!
You should now have a fresh arm64 kernel in ./arch/arm64/boot/ directory.
Development VM
So we have a kernel now, and now we need to run it. The easiest way is to use a QEMU VM. But to do this we need a disk image with the rest of the system.
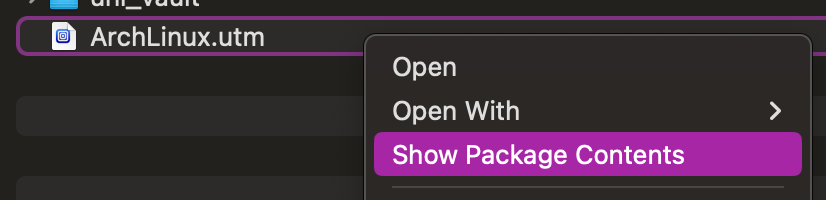
You can create, format and install Linux on it yourself, but it’s easier to just download it. I recommend downloading the Arch Linux for UTM.
As you can see it’s a .utm archive, so we’ll need to extract the qcow2 file from it.
But before that, do yourself a favour and do the following:
- open it in UTM
- Remove
rootpassword - Enable autologin
- Install some useful tools
pacman -Syu lsof fastfetch strace
Now to get the qcow2 file:
Then from the Data directory, copy the .qcow2 file to the directory in which you want to run the VM.
Running the development VM
If you haven’t already, install QEMU brew install qemu (or pacman -Syu qemu if you’re playing on easy).
Then you can run the VM with the following command:
qemu-system-aarch64
    -machine virt
    -cpu max
    -m 1024
    -drive file=arch_aarch64.qcow2,format=qcow2
    -serial stdio
    -kernel "<path to linux directory>/arch/arm64/boot/Image.gz"
    -append "root=/dev/vda2"
What does this command mean?
qemu-system-aarch64 | which QEMU vm to run |
-machine virt | use the generic arm64 machine |
-cpu max -m 1024 | configure the CPU and memory |
-drive file=... | the disk image to use |
-serial stdio | configure the VM to run in the current terminal |
-kernel ... | the kernel to run |
-append ... | the kernel command line arguments; in this case the location of root filesystem inside our image |
If you haven’t removed the password, you can log in with root and root.
To check which kernel you’re running, you can use fastfetch (or uname -a):
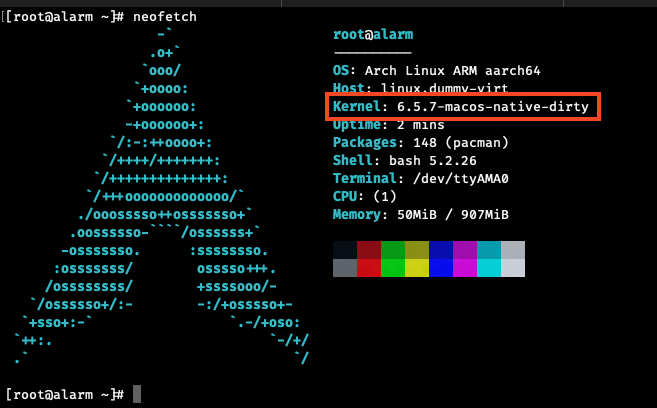
Highlighted you can see the local version we added earlier.
Conclusion
So, we have a working kernel and a running VM. We can start developing the modules now.
But a good editor setup is crucial for a good developer experience, so if you’re interested in that, check out the next article. (The link is under the footnotes)
1 If you prefer to stay in the terminal all the time, just fullscreen the VM, but VS Code locally vs. over SSH in a VM is a different experience. ↩
2 You could also create a partition with case-sensitive APFS, but I didn't have any place or external drive to do that. And an SD card was too slow (I tried it so you don't have to!) It might also cause problems with VS Code. ↩